Working with Rows, Columns and Cells
Working with Rows, Columns and Cells
In this step by step Excel tutorial, you will learn how to Insert and delete rows, Columns and cells in Microsoft Excel.
1. Inserting Row
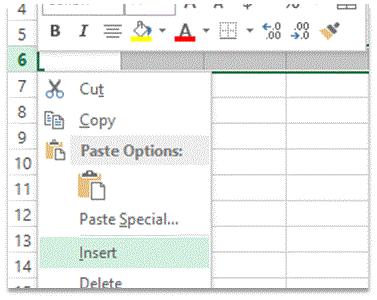
There are two methods of inserting a row. The first method is to select the whole row where you want to add a new row by clicking its row label. Then right click on the row label and select “Insert” from the Context Menu. This will add a row above the selected row.
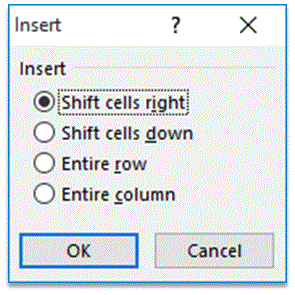
Another method is by right clicking the Cell where you want to add a row. You will then select “Insert” from the Context Menu. This time, an “Insert” pop will open with multiple options, you will select “Entire Row” and will click OK. This will add a new row.
2. Inserting Column
There are two methods of inserting a column. The first method is to select the whole column where you want to add a new column by clicking its column label. Then right click on the column label and select “Insert” from the Context Menu. This will add a column on the left of the selected column.
Another method is by right clicking the Cell where you want to add a column. You will then select “Insert” from the Context Menu. This time, an “Insert” pop will open with multiple options, you will select “Entire Column” and will click OK. This will add a new column.
3. Inserting Cell
To insert a cell, right click the Cell where you want to add a new cell. You will then select “Insert” from the Context Menu. An “Insert” pop will open with multiple options. Now, if you want to add a cell in vertical order (column wise), you will select “Shift cells down” and click OK. This will move the selected cell downward and your blank cell will be inserted. However, if you want to add a cell in horizontal order (row wise), you will select “Shift Cells Right” and click OK. This will move the selected cell towards right and your blank cell will be inserted.
4. Deleting Rows
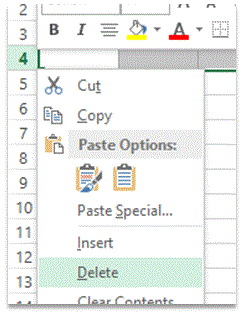
The process for deleting a row is very much similar to the process of inserting a row. Here to, you will select the row, you want to delete, by right clicking its row label and selecting “Delete” from the Context Menu. This will delete your desired row.
5. Deleting Column
The process for deleting a column is very much similar to the process of inserting a column. Here to, you will select the column, you want to delete, by right clicking its column label and selecting “Delete” from the Context Menu. This will delete your desired column.
6. Deleting Cells
The process for deleting a cell is very much similar to the process of inserting a cell. Here to, you will click the cell, you want to delete, by right clicking the cell and select “Delete” from the Context Menu. A “Delete” pop will appear from which you will select the desired option and click OK.
- Shift Cells Up: By selecting this option, your cells will move upward within the column
- Shift Cells Left: By selecting this option, your cells will move to left within the row
- Entire Row: By selecting this option, you will delete the entire row containing the selected cell.
- Entire Column: By selecting this option, you will delete the entire column containing the selected cell.


